I’ve always considered myself a programmer at heart. I studied Software Development at the Rochester Institute of Technology and spent my entire corporate career writing code. But here’s the twist – these days, as the guy behind Digital Maestro, I don’t do a whole lot of coding anymore. Most of my time is spent helping clients with their websites, marketing strategies, and online visibility. So when I wanted a plugin to show an image in a comment, I knew that I had to create a plugin for the Ultimate Blog Challenge. I saw it as the perfect opportunity to flex my coding muscles again.
The goal was simple: I wanted to make it easier for people to “See” more than just a link when sharing a post in the Ultimate Blog Challenge, and have the image from the blog post display correctly when shared. You know how it goes – you share a link, and instead of a nice image preview, you get a boring, empty box or the wrong image entirely. Not the best look, especially when we’re all working hard to drive traffic to our blogs.
So I rolled up my sleeves and got to work. And my “I,” I mean I had some help from my AI buddy!
The First Attempt: Featured Image Only Got Me So Far
My first instinct was to use the Featured Image from WordPress sites. That’s the go-to method, right? It worked beautifully… for WordPress blogs. But the Ultimate Blog Challenge community is full of variety. We’ve got people blogging on Blogger, Wix, Squarespace, and other platforms. As soon as someone posted a link to a non-WordPress site, the image didn’t show up.
Then Came the Image Size Problem
Next, I figured I’d just pull the first image on the page. That seemed logical. And technically, it worked, but it pulled in the full-size image. One test post I shared ended up displaying a giant image that looked more like a billboard than a blog preview. Back to the drawing board.
I adjusted the code to pull in a smaller version of the image. That cleaned things up nicely, but it still wasn’t foolproof. Blogger sites, in particular, were throwing me curveballs. Their structure is just… different. So I had to write some custom code just for them. It wasn’t elegant, but it worked. When coding, many times “It Works” far outweighs “Elegant!”
Diving Deeper: <img> Tags and the Body
Eventually, I realized that the best approach might be to search the <body> of the page for the first valid <img> tag. This gave me better control and improved consistency across platforms. Still, even that had hiccups. Some sites had odd HTML formatting, or images loaded dynamically with JavaScript.
But that’s the nature of writing code. It’s less about getting it right the first time and more about testing, failing, tweaking, and trying again. Each failed attempt was another step toward a working solution. It was frustrating at times, but honestly? I loved every second of it. This kind of problem-solving is exactly what sharpened my logical thinking skills back in my college days.
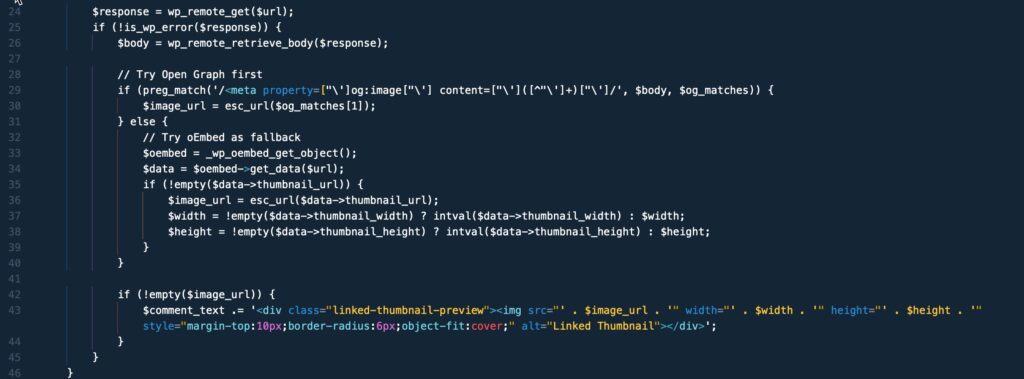
The Final Touches: Open Graph and oEmbed
Eventually, I expanded the plugin to check for Open Graph data and oEmbed metadata. If a site wasn’t using WordPress and didn’t have a clear <img> tag, chances were good it still included Open Graph tags—especially if the blogger shared to social media. This gave me a much more reliable fallback to grab a relevant image.
Now, the plugin works across the board—WordPress, Blogger, and many other platforms. It grabs an image that makes each shared post look polished and professional. I think I got a high majority of sites! There are some cases, for some sites, that nothing shows up… I had to stop somewhere! Maybe Version 2 will fix that ‘known bug.”
Final Thoughts
Creating this plugin reminded me just how much I love coding – even if I’m a bit rusty. It was a challenging project with plenty of trial and error, but it also reminded me why I got into software development in the first place: solving problems and making things better.
If you’re participating in the Ultimate Blog Challenge, I hope this little plugin helps your posts stand out when they’re shared. And if you hit a snag or have a platform I haven’t accounted for, let me know—this code is always evolving!
Thank you so much your efforts, Paul! Having a preview of a picture is one thing I preferred about posting on the FB thread.
You’re welcome! I’m glad you appreciate the effort. I was missing the preview as seeing it as well. If you have any suggestions or feedback, feel free to let us know. I am always looking to improve things.
If anyone can do it, it’s YOU, Paul! And you did!!
Aren’t you the sweet one to say nice things! And I am sure there are plenty of peoplpe that could do it better. FOr me, it is just about getting better a little bit each day. And this is working! Thanks, Kate!
It’s a wonderful way to use your coding skills Paul.Loved how you explained the steps and the mindset.
Thank you for your kind words! I’m glad you found the explanation helpful – well probably not helpful… but.. informative? Thanks for stopping by, Dr. A.
Great work, Paul, but it’s all Greek to me! LOL
Thank you for your feedback! I’m glad you enjoyed the content, even if it felt a bit foreign to you. If there’s anything specific you’d like me to clarify or explain in more detail, feel free to let me know! I realize a bunch of this is pure techie talk….
Thank you, Paul! The plugin seems to be working beautifully. (Now can you pretty please set up the comments to save our credentials so we don’t have to input them every time we comment? – insert cheesy grin -)
All you have to do is ask… Done!
Thank you for sticking to it and giving us a more pleasant posting experience.
You’re welcome! I am trying to improve the platform and provide a better user experience for all our members. If you have any suggestions or feedback, Elisa, let me know! No promises, but I will see what I can do!
Thanks for all your hard work and not giving up.
That reminds me of the video… https://allaboutgratitude.com/5912/want-more-gratitude-just-do-it/ -oops! “This is not Never Give Up!” It is “Just Do It!” – oh well – still a good one!
I was very surprised yesterday to see an image with our links. You know what they say about a picture is worth a thousand words. Thank you very much. I know nothing about plugins and codes. Maybe one day I will take the trouble. But right now my brain is like scrambled eggs.
Thank you for your comment! I am glad to hear that you enjoyed the image with the links (finally?).